
Copyright: This lesson MAY NOT be copied to your website or blog, please use the social networking buttons above to link to it. See our Terms and Conditions.
This free lesson assumes the student has some knowledge in practical photography (equivalent to a pass level in our Basic Photography course).
If you like what you see in this lesson, but cannot understand all the information given, enrol in our new Creative Photography course and get all the help and encouragement you need! All our courses enjoy tutor assisted learning so you are never left alone wondering what it all means.
 |
Once the sun has set many photographers will pack away their cameras and go home. They are missing out capturing some of the most stunning and visually exciting images to be had.
Throughout our courses we emphasise the importance of light for the photographic image. This does not mean that if there is no daylight, there are no good photos to be captured.
Taking photographs at night is a lot simpler to achieve then one might think. The results can be very stunning and strange effects are easy to master. It is also possible to take top quality night images with just basic equipment.
Here we have some guidelines on the possibilities open to us with night photography.
 |
With many night photography subjects, total darkness at night isn’t necessarily the best time to actually do ‘night shots’. Late dusk is usually the preferred time. This is when there is just a bit of light left in the sky after sunset or before sunrise for the early rising photographer.
The advantage of shooting at this time is less large areas of black in the image, this cuts down on excessive contrast and adds more colour to the image. The residual daylight that is left will also ‘fill in’ the large shaded areas that are not lit by artificial lighting.
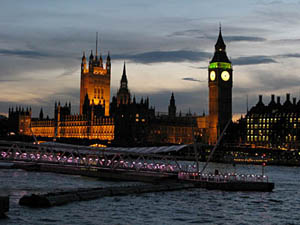
In fig n.2 is probably one of the most photographed scenes by day and night. At dusk you get the best of both worlds with the residual daylight showing cloud detail and reflection on the water. The spotlighting on the buildings has added colour and of course the clockface is perfectly lit.
This does not mean that all night shots should be taken at dusk. There are certain subjects and night photography techniques that are more successful with the total darkness of night.
Fig n.2 Canon G9 1/8 sec @ f3.5, ISO 200. Tripod used.
How to Expose for the Night
The metering systems in all cameras are designed for use in daylight conditions. Therefore a meter reading can only be used as a “starting point”. There are a few factors in night photography that make camera meters unreliable.
Exposure meters work on the premise that the area being read contains equal amounts of light and dark areas. It can then integrate the reading to a tone of gray. 90% of the time this works fine and experience will tell you when meters will not operate 100% accurately. In much the same way as we’ve covered earlier in the course regarding tricky lighting situations. For example, large amounts of dark unlit areas with small bright points of street lighting will lead to over exposure.
In the “old days” using film, the photographer could not see the results. There was further issues regarding film that made it more difficult to get good night exposures as we will expand upon later in this lesson. Using a digital camera, simply take a meter reading and take a test shot. If the image is too dark or bright, simply adjust the exposure accordingly until the image replicates the scene.
Bracket Exposures: It is always best to bracket exposures as even with digital cameras, the image on the viewscreen cannot be properly judged. For more on Exposure Bracketing see our range of courses.
You will find that metering off light sources, for example lighted or neon signs will give a much faster exposure then reflected light from street lighting or floodlight. Although a meter reading may be a fair starting point, a certain amount of experience can go a long way. As you gain your experience with night photography you will find that your instincts in estimating an exposure will surpass any camera meters capability.
Exposure Tools
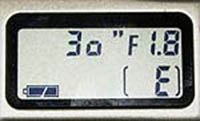 |
There are features on all DSLR cameras and many advanced digital compacts that make photography at night possible. Due to the lack of lighting exposing the image generally takes much longer. This is where the slower shutter speed settings become a valuable asset. Most cameras have shutter speeds up to 30 seconds. Often indicated as 30″ on the camera as seen in fig n.3
Here are a few camera features seldom used for daylight photography that are invaluable at night.
Timed Exposure Features
B or Bulb setting – Once the shutter dial is adjusted to “B” or BULB (fig n.3), the shutter will stay open as long as the shutter button is pressed and will not close until the shutter button is released.
On film cameras, one way to see this effect in practice is to open the back of the camera when there is no film in it. Then set the shutter dial to “B” and press the shutter button. The shutter will stay open until you decide to release it. This operation cannot be seen in the same way with a digital camera but the effect can be viewed on the LCD screen after an image is taken. Using this setting may take a small bit of practise because we automatically tend to release the shutter button as soon as we press it.
T or Timed setting This setting is used in a very similar way to the “B” setting and the same effects can be achieved. The difference between the two though is that using “T” the shutter is pressed once and released to open the shutter. The button is then pressed again to close it. The advantage of this over the “B” setting is that the photographers hands are free and the risk of camera shake is reduced. Unfortunately very few cameras have this setting.
When using either setting the timing is done manually by the photographer. Rather than depending on a cameras shutter timer, the photographer must count off the desired seconds (or minutes) the shutter is to remain open. The risk of camera shake, especially with the “B” setting is extremely high.
In order to avoid blur from camera shake using either the B or T setting, some sort of remote release is almost essential.
Sensitivity Ratings: It is a common belief that the lower the available light, the faster the ISO rating needs to be to record enough light. Usually this is true, however, fast ISO settings are not always necessary for night photography.
Normal ISO settings (100 to 400 ISO) can be used successfully. The exposures needed would just be longer, sometimes for several seconds. Hence the need for a sturdy support such as a tripod!
Self Timer: If you do not own a remote release, an alternative is to use the self-timer for tripping the shutter. This only works however for shutter speeds that can be selected on the camera. Most cameras have shutter speeds up to 30 seconds. Note: The B or T settings cannot be used with the Self Timer.
So, put the camera on a tripod, compose the shot, adjust your exposure. When you are ready, set the camera timer, then trip the timer and stand back while the camera takes the shot for you. Remember to wait until the shutter closes before aproaching or touching the camera.
Night Scene Mode
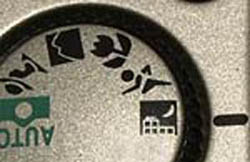 |
Many DSLR and compact cameras have a “Night Scene Mode” (fig n.4). This allows the user to take photos at night outdoors. The way most of these work is to set the camera to the mode and simply take the picture. In most cases the flash fires automatically to light a subject in the foreground and a prolonged shutter speed will record any ambient light in the background.
Some cameras will allow the flash to be switched off if preferred. On other compact cameras the exposure can be adjusted through “Compensation” to fine tune the exposure. In most instances the exposure would be deliberately over exposed for best results.
The results can vary with this mode depending on the situation and how well the particular camera can cope with the situation. Because of the lack of full control however the results are “pot luck” in the end. Remember though that a tripod is still necessary and using the Self Timer would also be a help for preventing camera shake.
Using Flash
Flash used indoors can be quite powerful and a handy source of lighting. Outdoors at night though it is much weaker as there is no surfaces for the flash to “bounce” off and reflect back into the scene. The distance that flash light travels is also considerably less than whats needed for most night scenes. In an outdoor setting, the built in flash on a camera will have little or no affect on the scene. For more on Flash Photography see our range of courses.
The flash will light anything that is within a few feet of the camera but anything beyond this will not be lit with the flash. Attachable flashguns are much stronger but even they can be stretched a bit in some situations.
Painting with Flash
 |
One way of overcoming a flashes lack of distance with a flashgun is to light various elements in the scene by using the flashgun off the camera. To achieve this technique you must have near enough access to the subject you want to light and plenty of time to get there. Here we have a step by step example of how to use a simple off camera lighting technique without any special equipment.
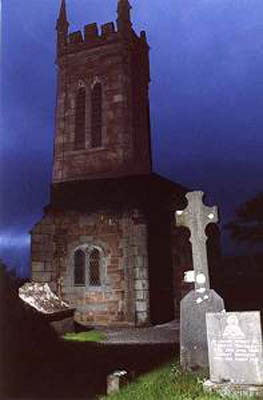
With fig n.5 of a church and graveyard, the camera was set on a tripod. The shutter was set to the “B” setting and the aperture was set to an f-number of f5.6 for reasonable depth of field and proper exposure of the flash. A locking cable release was used to hold down the shutter button for the duration of the exposure.
Since there was very little ambient light, there was no worry of the photographer crossing in front of the cameras view while the exposure was taking place. Once moving the photographer will not register on the film as long as the flash does not illuminate the photographer or their shadow.
Three flashes off the one flashgun were used to light this scene. This was done by moving close to each area and firing the handheld flashgun using the flash’s own “test button”. One burst of flash was used on the headstones in the foreground and two on the church. One on the front and one aimed at the steeple.
In this case the whole exposure took about 40 seconds. Some residual daylight off the near dark sky registered but all other lighting was done by the flash.
Multiple Exposure It is possible to go about this technique in other ways. One would be to use Multiple Exposure if the camera has this feature. This would mean using one of the cameras shutter speeds and the cameras self-timer. The self-timer would allow time for the photographer to get into position for the flash. Once the shutter is opened, the flash is fired either via the test button.
Another method of lighting with multiple flash is to use a very long set exposure such as 30 seconds. In this instance though you would need a flash with a rapid recycle time to get all three bursts. Trip the timer and get into position for the first flash, once you have taken it get into the next position rapidly and fire as soon as your flash has recycled. You may find that 30 seconds is not really enough time to get all three flashes in however. These techniques can also be used in other areas of night photography.
Fig n.5 Canon EOS 500n, 28-80mm lens, B setting (approx 40 seconds) @ f5.6. Fuji Superia 100 film.
Artificial Lighting
With night photography the lighting you are using is all artificial except for any residual daylight at dusk or dawn. As we have previously discussed in this course (For more on Light and Colour see our range of courses), artificial lighting has a colour cast much different to midday light. To complicate matters different man-made lighting sources give off different colour casts. A typical night image may have numerous different types of light sources lighting the scene. These would be of different strengths and colours. This fact often adds to the impact of the night photograph.

fig n.6.1 Daylight Balanced

fig n.6.2 Tungsten Balanced
The colour casts given off by artificial lighting can be changed through the use of the White Balance setting on a digital camera. This gives an even further amount of creativity in taking the photo. The image taken in fig n.6.1 was taken using a Daylight balanced setting. The image in Fig n.6.2 was taken using the Tungsten Lighting setting, Which is the better result is really a matter of taste. Often though the warm cast of artificial lighting is preferred. Similar results can be produced with a film camera using Colour Correction Filters.
Extremes of Lighting
An important factor in night photography is how the lighting is portrayed in the scene. When portraying rows of street lighting for example, the direct light source itself is being photographed, therefore the lighting being exposed is very bright. An image of a floodlit building on the other hand is an image exposed by reflected light. This naturally is much weaker and would need a much longer exposure.
 |
In many cases the two types of lighting would be portrayed in the same image, this would lead to extreme contrasts and very difficult exposure metering problems. In a case like this it is always best to expose for the reflected light and ignore any lighting that is portrayed in the image. Doing this will no doubt lead to overexposure of the light fixtures, but this can look quite acceptable in the image.
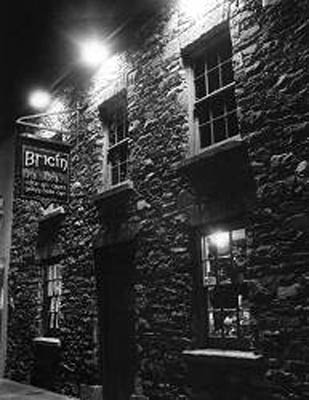
Fig n.7 was taken of an Irish pub would have been underexposed had the meter reading given be used. The strong floodlighting would have been the only detail in the image, leaving the rest of the image black. The photographer has decided that the stone detail is an important feature to capture.
An exposure of 8 seconds at f11 was used to record the light reflected off the building. Even though this exposure overexposed the floodlighting, it still doesn’t take from the image.
Fig n.7 Olympus OM1, 28mm lens, 8 sec @ f11, Ilford FP4 film
Using Movement
With extremely low light levels, moving subjects such as people walking will not register in the image so long as there is very little light shining upon them. Cars are a good example of using this technique.
With long shutter speeds and moving cars, the headlights and taillights will register as streaks. The cars themselves will not register on the image. This effect can also be used at fairgrounds where amusements lighting can be recorded while moving.
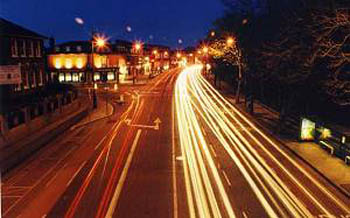 |
In fig n.8.1, an exposure of 30 seconds at f16 was used. The long shutter time allowed the cars to move fully through the frame leaving their headlights and taillights to “streak” through the frame.
Notice that detail from the cars did not register in the image. Since there was some ambient lighting in the sky and street lighting, a high f-number was used to keep the scene from overexposing and lengthening the exposure time to enhance the effect.
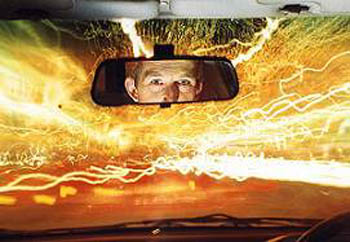 |
In fig n.8.2 a different approach was taken. Instead of mounting the camera on solid ground it was “taken for a ride”.
In this image the camera was mounted on a tripod positioned in the backseat of a car. As the car was driven an exposure of 30 seconds was used. As the car moved the street lighting and oncoming cars headlights registered in the image and drew “streaks” across the image.
The driver, viewed in the rear-view mirror, was lit with a flashgun that was used off camera and directed at his face.
Warning – Firing a flashgun at a person while driving may blind them temporarily, even from outside the car. This can be a dangerous technique that should be carried out carefully with the drivers knowledge and consent.
Fig n.8.1 – Canon EOS 500n, 28-80mm lens, 30sec @ f16, Fuji Superia 100 film
Fig n.8.2 – Canon EOS 500n, 28-80mm lens, 30sec @ f32, Fuji Superia 100 film
Shooting the Moon
If you are fortunate enough to have the Moon in the right location in your image, count your blessings and shoot it quick. You would be surprised at how fast the Moon crosses the sky. Typically it travels about its own diameter in distance across the sky in about two minutes.
When exposing the full moon, the first thing to consider is that the Moon is a lot brighter than one might think. Remember that on a sunny day here on earth, the average exposure for 100 ISO is 1/125 at f16. The Moon receives roughly around the same amount of sunlight. Therefore your exposure of the Moon is roughly around the same exposure as for daylight. However, you should allow for the phase of the moon you can see and how much haze of our atmosphere you are shooting through. The higher up in the sky, the less haze to shoot through. Alternatively a camera spot meter using a long lens may result in an accurate exposure.
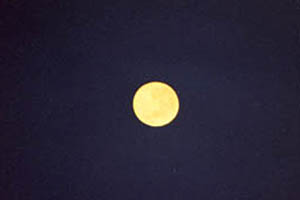 |
It would do no harm to open up your exposures to say 1/125 sec. at f8 for a brighter image of the Moon. Detail of the Moon on a clear night will register quite well. Fig n.9 was taken at 1/60 sec. at f8. It’s yellowish appearance is due to a hazy sky, the exposure also needed to be that bit longer.
Overexposing the Moon too much will just make it a white glow and using too slow a shutter speed will make it an oval shape. The combined rotation of the Earth and the Moon around it makes it very possible to get a blur of light instead of a nice sharp Moon, especially as already stated when using a telephoto lens to capture it.
Lens Choice – Using a standard 50mm lens (on 35mm film) the moon can appear quite small in the image. For a rough guide using 35mm film, you need 110mm of focal length per 1mm of moon on the negative. This will bring the Moon in closer and make it much bigger in the final image. Remember though the Moon is moving quite quickly and using a telephoto will exaggerate that movement.
Adding a Moon
As we have stated, it is difficult getting the moon in the right location for a night photo. However it is quite simple to add it to an image. Therefore it would be good to take a photo of the moom on its own. Then have it handy to add to an image later using a digital editing program. For more on this and everything about digital image editing, enroll in our Digital Imaging Course.
Fireworks
To watch a fireworks display is quite spectacular. However capturing exciting fireworks images needs careful planning and a bit of luck.
Fig n.10 was taken at Epcot, Disneyworld, Florida. This is argueably the most spectacular fireworks display in the world and it is performed every night. Contrary to what is advised here for most firework displays, there is so much set off here, the exposure took only 4 seconds.
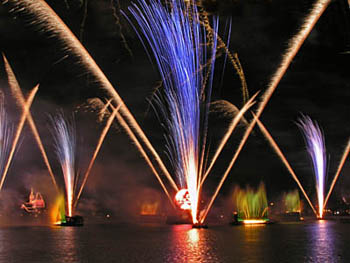 |
Each burst of firework can takeup to 5 seconds to complete its pattern in the sky. To capture one burst is nice but sometimes it may not look as striking in an image as a few bursts of fireworks. Therefore ideally the exposure should be long enough for at least 2 or three bursts of fireworks to appear on the image.
As fireworks are set off at night, this does give the chance to use long exposures without fear of over exposure unless there is a large amount of ambient artificial lighting showing in the image or traces of daylight.
There are a number of ways of shooting fireworks, depending on the features available in your camera. Some cameras may only have set shutter speeds up to 30 seconds. Other cameras may have a B setting, which allows the shutter to stay open indefinitely. Here is a few different ways to capture fireworks.
Using Set Shutter Speeds:
- Put the camera on a sturdy tripod.
- Use Manual Exposure Mode and set the aperture to a fairly high f-number of at least f16. This will reduce the exposure of any ambient lighting. Disregard any meter readings. Set the camera shutter speed to the desired speed, which should be long enough to expose a few bursts. 15 to 30 seconds should do but longer if your camera has a longer setting.
- Switch off the Auto Focusing and set the lens to infinity. use a wide angle lens to capture as much of the sky as possible. Ideally compose the framing with the first few bursts of fireworks so you ensure all will be within the frame.
- Wait for rocket on the way up, Press the shutter button and keep your hands off the camera while the exposure is taking place. Hopefully a few bursts will appear during the exposure time.
Using the “B” setting: The same procedure as with using a set shutter speed. Except this time the camera is set to B and the shutter can be kept open much longer. You will need a remote release that will keep the shutter open manually.
Using a Lens Cover as a shutter: When using the B setting a lens cover can be used to cover the lens while no fireworks are set off. This will reduce exposure of any ambient lighting and increase the chances of getting many more bursts of fireworks on one frame. The same setup applies as for Set shutter speeds and using B except:
- Trip the B shutter using a remote release but with the lens cap on the front of the camera.
- When a burst comes, very carefully remove the lens cap without moving the camera. Any ambient lighting will record blur if the camera is accidently moved even a fraction.
- After each burst is finished, very carefully put the lens cap back on.
- When you feel you have enough fireworks on the one image, close the shutter with the remote release.
This method is a bit “trial and error” as the camera is prone to be moved and if there is a lot of ambient light about, prone to over exposure as well. The trick is to minimise the amount of scene that may be lit.
Multiple Exposure: Few cameras have a Multiple Exposure mode. However if yours has this then it can also be used. The same steps are used as for using a lens cap except you are pressing the shutter rather then using the lens cap as a shutter. A remote release would be very beneficial as pressing the shutter button by hand could move the camera.
Using Film at Night
The main problem with taking photos at night is getting the exposure right. This is mainly due to the camera meters design for daylight photography. This has been somewhat bridged by digital media as the image can be inspected immediately and corrections made by the photographer. However those with film cameras do not have this luxury and can only hope they get one good image out of a bunch that would have to be taken.
The inaccuracies of exposure metering is just one problem for the film photographer, another is a problem known as Reciprocity Law Failure.
Reciprocity Law Failure
Reciprocity Law failure is the loss in the exposure sensitivity of the film., Although the reciprocity law failure effect can take place with daylight photography, the long shutter exposures of night photography definitely suffer from this. This is caused by either a prolonged exposure period (more than 1/10 sec. shutter speed) or an extremely brief period of the shutter opening (shutter speeds faster than 1/2000 sec.).
As a brief example, if a film rated at 100 ASA was exposed for 2 sec. its film speed rating could fall to 50 ASA. What this leads to is underexposure if the image taken at the camera meters correct exposure reading. Exposure meters do not take into account reciprocity law failure. With colour film the colours would also be affected giving a slight colourcast to the image. It is very difficult to allow for reciprocity failure as different films and even different batches of the same film react differently under these conditions.
It is extremely important to Bracket exposures when using film for the best chance of success. For more on Exposure Bracketing see our range of courses.
As a very general guide use the following table.
| Film Type | 1 Second | 10 Seconds | 100 Seconds |
| MonoChrome | + 1 stop | + 2 stops | + 3 stops |
| Color Negative | + 1 stop | + 2 stops | + 2 ½ |
| Color Slide | + ½ stop | + 1 ½ stops | + 2 ½ stops |
Summary
We hope that the School of Photography’s Night Photography lesson has not only been a learning experience but has also created food for thought. If this lesson has you thirsting for more information, have a look at the other courses we have on offer including:
For more free tips on photography please Free Photography Tips pages
For more information please see our Frequently Asked Questions page
or email info@schoolofphotography.com
Happy night shooting, have fun.
want to know more night shooting