
Painting Black & White Digital Images
Painting black & white photos is a technique nearly as old as photography itself. Old photos were often coloured using paints and dyes. This was a very time consuming and intricate task, which was a highly skilled technique. And as if painting still images wasn’t a slow enough process, painting black and white film footage was also practiced. Adding colour to a black and white image has been made far simpler using digital imaging and can be achieved simply, even with a shaky hand.
Hand colouring an image can be done to the whole image or just colouring one single element. Here we will colour just one element in an image.
The original photo is of a few tools hanging in a tool shed, which is shown in fig 1. The image was originally taken in colour but has been “desaturated”. Desaturation removes all colour from the image but leaves the colour information file so colour can be once again added.
This type of image would benefit from a selective use of colour as it looks a bit fussy with many elements fighting for attention. Here we will just paint the oil can to make it become the central point of interest in the image. We will be using Paint Shop Pro for this exercise but it can be carried out on just about any digital editing program.
fig 1 Original Image
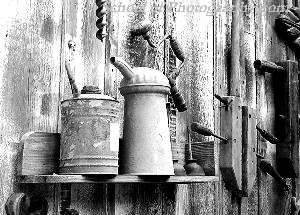
fig 2 Freehand Mask Settings
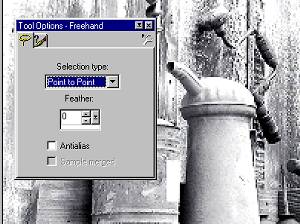
Step 1 – Using the freehand mask (also known as a Selection Tool) we carefully outlined the oil can. The freehand mask was set to ‘point to point’ to allow for easier drawing of straight lines as seen in fig 2. The feather was set to ‘0’ so the line would be hard and no overlapping will occur. Feather is a method of softening the line of the selection.
Step 2 – The Paint Brush Tool is now selected and in the Tool Options Window and in fig 3, the settings shown were used. Again most programs would have equivalent options. The size of the brush was made larger then the can so that the brush could make one clean sweep across the can. Continuous stroking using the brush would cause overlapping of colour creating uneven colouring. The opacity was set quite low so that image detail would come through the colour. In Paint Shop Pro Opacity is the transparency of the colour.
fig 3 Paint Brush Settings
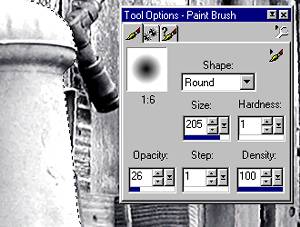
fig 4 The Finished Image
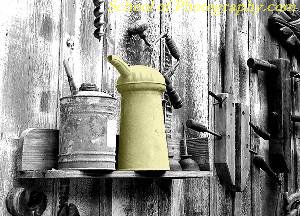
The secret to the success of this technique is to get the opacity just right. If the colour is too strong it will obliterate all detail in the area being coloured. Too light and it won’t look very effective. As with many digital enhancements, trial and error is the real key to success.
There is more than one way to carry out selective colouring to an image such as we have shown here. Using just the tools in an image editing program, this is one way to colour in a black and white image. However there are more ways to do this with even better success. Want to know how? Enroll in our Digital Imaging Course and you can start to learn these techniques almost immediately.